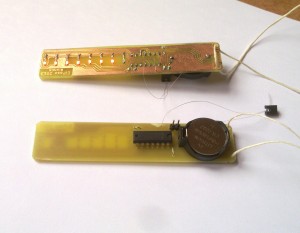

The LED POV shining in the dark.
Schematics
The scheme is pretty straightforward, 8 LEDs, each connected with its own resistor and one MCU port, a battery, a switch on the supply line and and optional programming (SBW) Â connector.

 The board
The board uses 0805 SMD parts except for the MCU which is 14-pin PDIP through-hole, I’ve made the PCB with toner-transfer technique and H2O2 + HCl etchant.
Soldering this tiny parts requires some experience, a fine soldering iron tip and a good lens. Don’t forget to test every single resistor for bridges while soldering, this makes  much easier to find a problem.
I connected the botton of the board with a thick thread, so that you can rotate it quickly in the air while keeping a cape in your hand.

MSP 430 LED POV PCB

MSP 430 LED POV PCB scheme
Follow the source, Luke!
Here is the code, the font file I used is available everywere on the net, for example here.
/**
 *
 * POV LEDS
 *
 * ../compile.sh 2211_c_pov.c "-mmcu=msp430g2211"
 */

#include

#include "font8x6.h"

volatile int msg_index = 0;
volatile int char_index = 0;
volatile int toggle = 0;
volatile int msg_length;

const char message[] = "HELLO WORLD!  ";

void setup() {1
    // halt watchdog
    WDTCTL = WDTPW + WDTHOLD;

    // make  port 1 pins outputs
    P1DIR = 0xFF;
    P1OUT = 0b00000000;


    /* The basic clock system control register 3 controls the oscillator
     * the auxilliary clock uses.  Change ACLK from external timer crystal
     * oscillator to internal very low-power oscillator (VLO) clock,
     * which runs at appoximately 12kHz.
     */
    BCSCTL3 |= LFXT1S_2;


    /* Basic clock system control register 1 controls the auxilliary clock
     * divider.  Set ACLK to use Divider 1, i.e. divided by 2^1. */
    BCSCTL1 |= DIVA_1;
    // Clock is now approximately 6KHz

    /* Set TimerA to use auxilliary clock TASSEL_1 and count up mode MC_1 */
    TACTL = TASSEL_1 + MC_1;

    /* Set counter */
    // POV: Should be around 5 - 40 ms
    TACCR0 = 4;


    /* Set capture/compare mode interrupts enabled, to trigger an interrupt
     * when TACCR0 is reached. */
    TACCTL0 = CCIE;

    // Message length (minus 1)
    msg_length = strlen(message) - 1;

}

void main(void)
{
    setup();
    /* Go into low power mode 3, general interrupts enabled */
    __bis_SR_register( LPM3_bits + GIE );
}


char reverseByte(char b) {
   b = (b & 0xF0) >> 4 | (b & 0x0F) << 4;
   b = (b & 0xCC) >> 2 | (b & 0x33) << 2;
   b = (b & 0xAA) >> 1 | (b & 0x55) << 1;
   return b;
}

/* Timer A interrupt service routine.  The function prototype
 * tells the compiler that this will service the Timer A0 interrupt,
 * and then the function follows.
 */
void Timer_A_isr(void) __attribute__((interrupt(TIMERA0_VECTOR)));
void Timer_A_isr(void)
{
    if(toggle){
        P1OUT = reverseByte(Font8x5[message[msg_index]][char_index]);
        // Char is 8x6, max column index is 5
        if(char_index == 5){
            // End charachter
            char_index = 0;
            if(msg_index == msg_length){
                // End message
                msg_index = 0;
            } else {
                msg_index ++;
            }
        } else {
           char_index++;
        }
    } else {
        P1OUT = 0x00;
    }
    toggle ^= 1;
    /* clear interrupt flag */
    TACCTL0 &= ~CCIFG;
}
 This simple project exploits the Persistence Of Vision (POV) of 8 LEDS connected to a port on the MSP430G2211 MCU, this is the chip I had available but the project should also work on other 14-pin devices of the same family.
I’ve built this boards as a New Year’s present for my nephews.


